Author’s note: this header image was generated by my own personal GenAI assistant, and much of this blog content was edited down by it as well.
Does anyone else ever worry that one day all your conversations with ChatGPT could be exposed? Or that your information will be out there to be data-mined and trained upon?
“Well, I have nothing to hide,” you say. Sure, neither do I. But it’d be embarrassing if my photo of this “random mark on my foot that won’t go away could this possibly be cancer” ever got out.
Over the summer, whenever I wasn’t rebuilding my fence for the 10th time or drinking whiskey with the neighbors, I started messing around with my home server to see if I could rebuild the ChatGPT experience with local hardware, safe from prying eyes and the dangers of the cloud.
This series walks through how I set up my own self-hosted, ChatGPT-style stack end to end. That means working speech-to-text, text-to-speech, image generation, and even web search. At the end of it all, I’ll wrap up with some final thoughts on the state of generative AI in general and my assessment of how the endeavor went (spoiler: it’s not as good as GPT-5, but it’s pretty damn good).
In Part 1 of this multi-part series, I’ll cover the basics: hardware used, the software I ran, and installation steps to get a working chat UI backed by a local LLM.
- A machine running Ubuntu 24.04, either virtual or bare-metal
- Docker + Portainer installed
- NVIDIA GPU container toolkit support
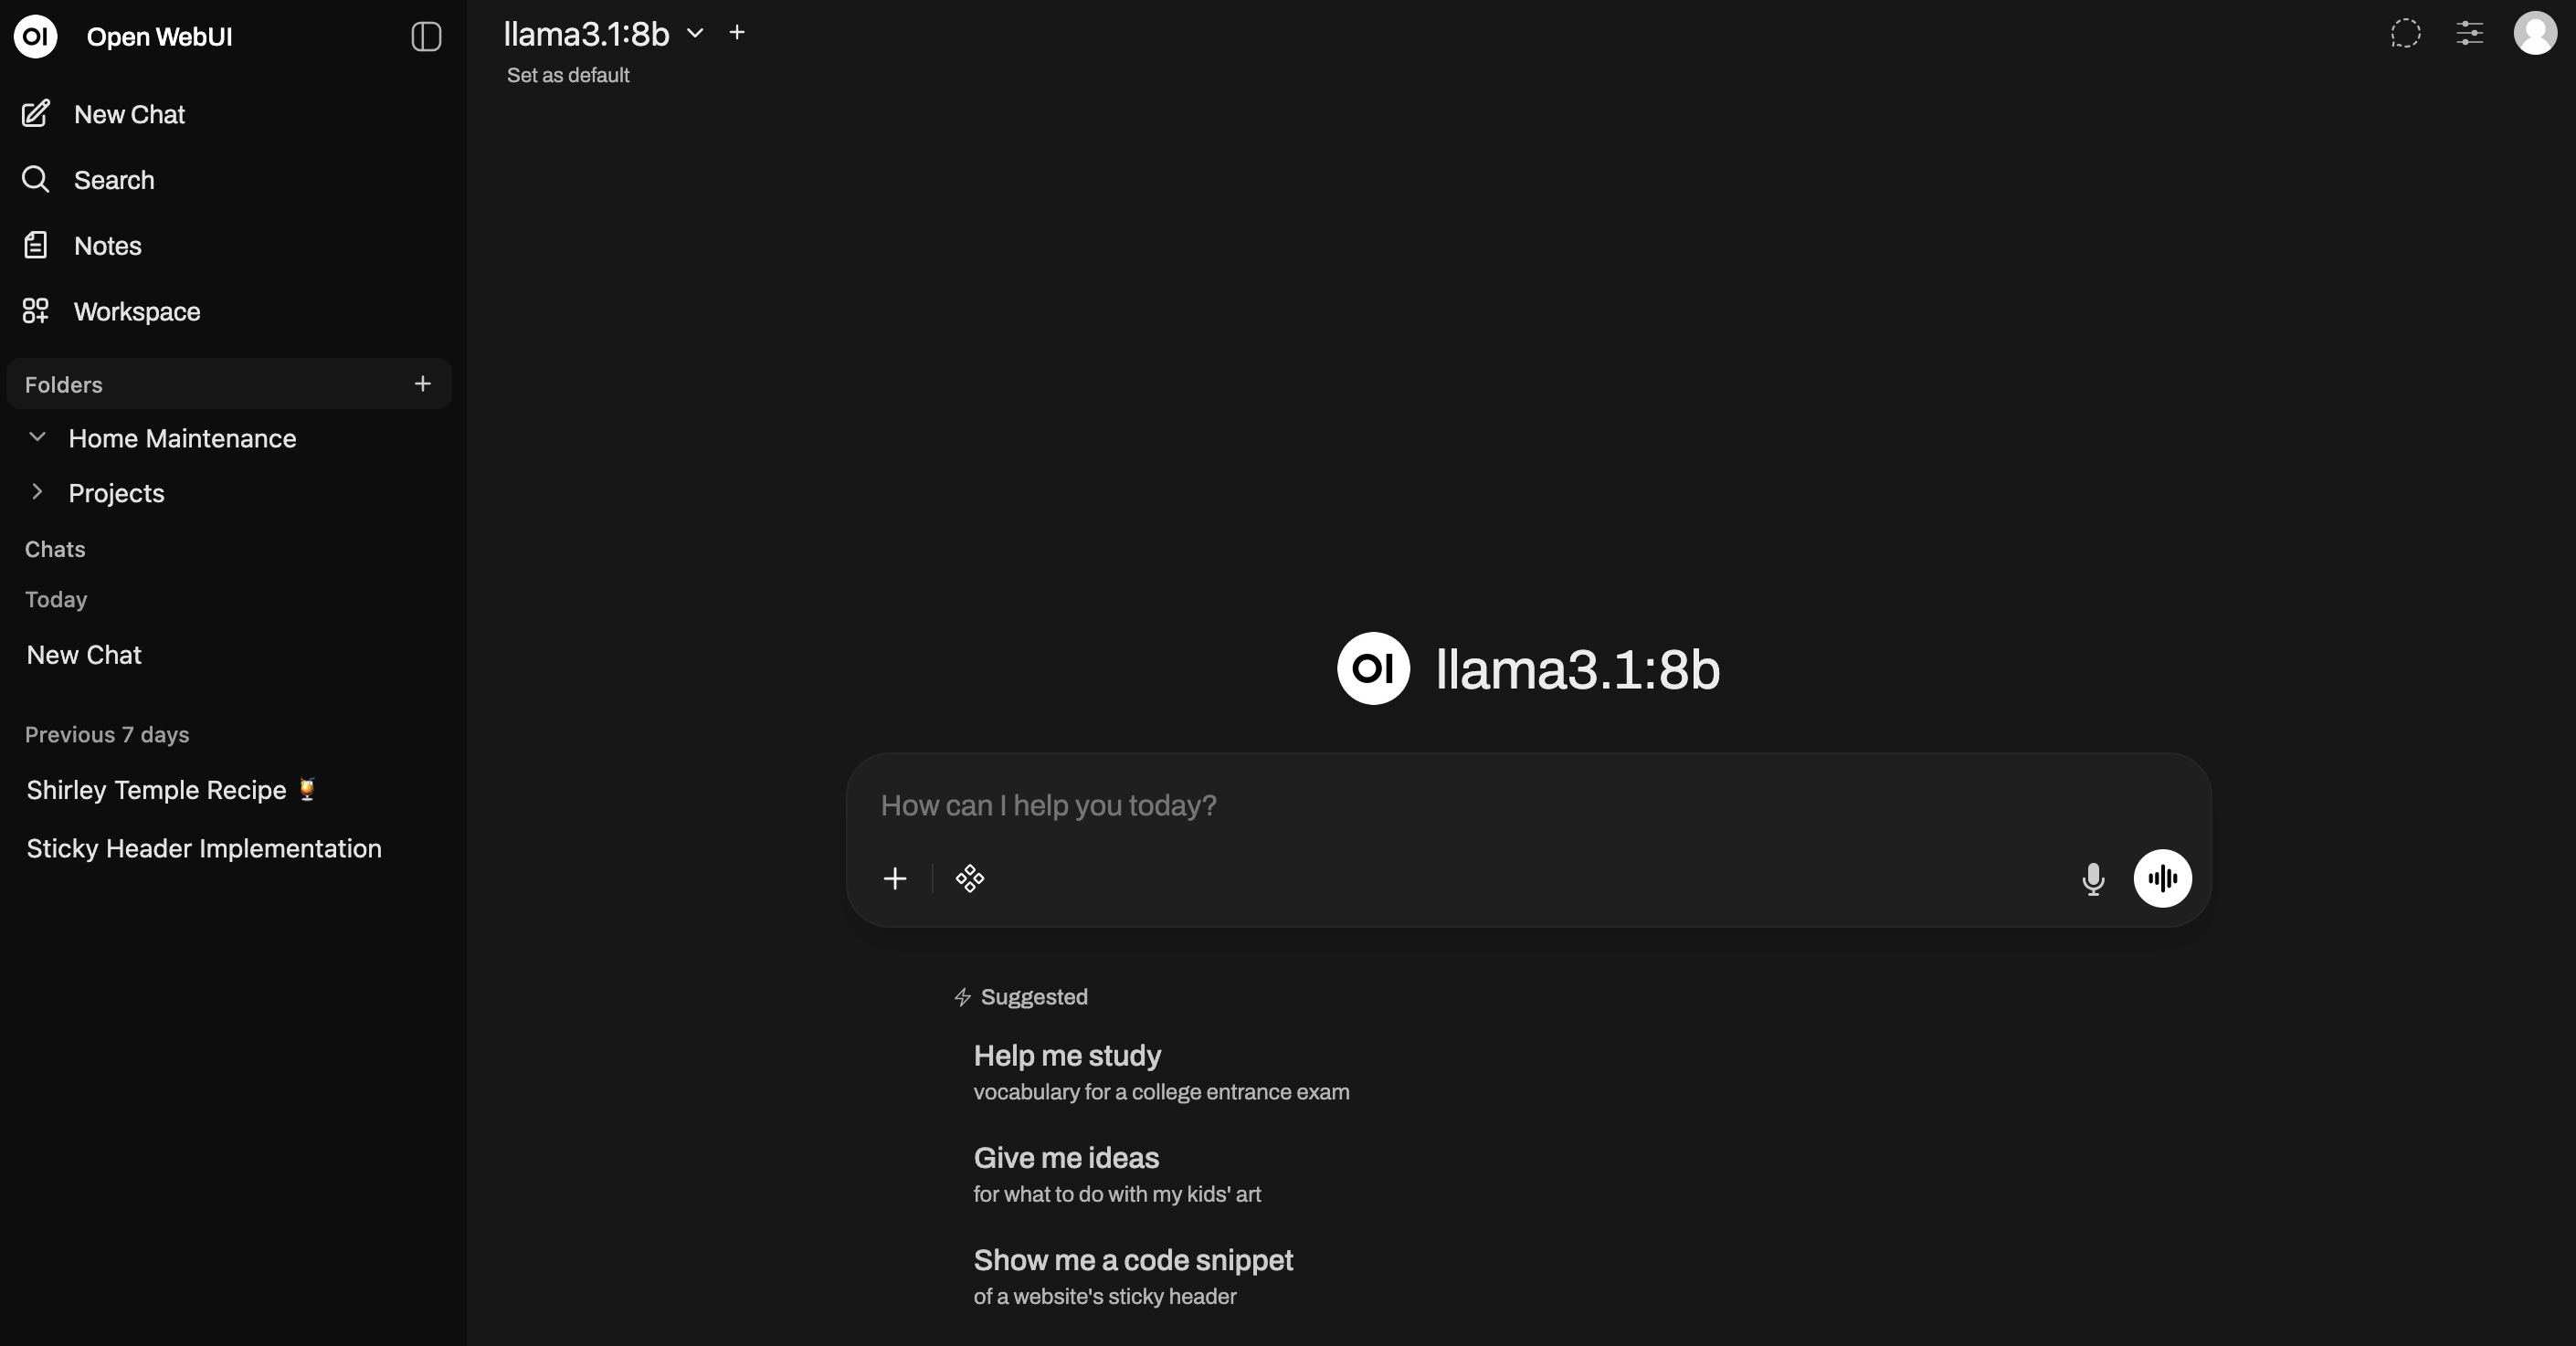
- OpenWebUI (the chat front end) running against Ollama (the LLM runtime)
Rationale
Why Ubuntu?
It’s a well-supported Linux distribution with robust driver support. If you intend to keep your LLM running full-time, you’ll want to drive this off a Linux distro.
Why NVIDIA GPU?
It’s simple: while unified memory can work, I’m not a big fan of running Apple hardware as servers given the cost, and I could put them to better use as personal PCs for myself or my family. Also, LLMs run most efficiently off VRAM, and if you intend to incorporate image generation and TTS (text-to-speech), CUDA support is mandatory. So NVIDIA it is.
Why Docker / Portainer?
Docker packages the solution into compact containers, and later on it makes version upgrades much simpler. As for Portainer, I like having a visual UI for my Docker Compose. If you prefer running command lines all the time, be my guest.
Why OpenWebUI + Ollama?
OpenWebUI is one of the most mature platforms for running LLMs in a chat-like interface and it replicates the ChatGPT experience closely. And of course, Ollama is required to serve up these LLMs.
Alright, with the defense of my methodology out of the way, let’s get into the requirements.
Hardware Prerequisites
- Host: an x86_64 box with intel or AMD CPU
- GPU: an NVIDIA card (RTX, A-series, or even GeForce with ≥12 GB VRAM is ideal). CUDA 12.8+ support is a big plus later down the line!
- RAM: 32 GB minimum if you don’t want the system swapping constantly.
- Disk: at least 200 GB free. Models and caches take more space than you think.
CPU won’t matter much here. My personal setup was an old server with an Intel Core i3-12100K, an NVIDIA RTX A2000 12GB, and 64 GB RAM.
Step 1: Install and run Ubuntu Server 24.04
Personally, I like to run Proxmox and install Ubuntu in a virtual machine; this is optional, and I won’t be covering how to do that here, nor will I walk through how to install Ubuntu. The only thing I’ll emphasize is do not install Docker via snap; it will be challenging to get the NVIDIA Container Toolkit to run on it.
Step 2: Install NVIDIA drivers
Once Ubuntu Server is up and running, remote in and update the NVIDIA drivers:
sudo apt update && sudo apt -y upgrade
sudo apt -y install build-essential curl ca-certificates gnupg lsb-release pciutils
sudo apt -y install ubuntu-drivers-common
sudo ubuntu-drivers autoinstall
sudo reboot
Afterward, check that the drivers were properly installed with:
nvidia-smi
You should see something like this:
Fri Sep 26 04:59:08 2025
+-----------------------------------------------------------------------------------------+
| NVIDIA-SMI 580.65.06              Driver Version: 580.65.06      CUDA Version: 13.0     |
+-----------------------------------------+------------------------+----------------------+
| GPU  Name                 Persistence-M | Bus-Id          Disp.A | Volatile Uncorr. ECC |
| Fan  Temp   Perf          Pwr:Usage/Cap |           Memory-Usage | GPU-Util  Compute M. |
|                                         |                        |               MIG M. |
|=========================================+========================+======================|
|   0  NVIDIA RTX A2000 12GB          Off |   00000000:00:10.0 Off |                  Off |
| 30%   53C    P8             12W /   70W |       4MiB /  12282MiB |      0%      Default |
|                                         |                        |                  N/A |
+-----------------------------------------+------------------------+----------------------+

+-----------------------------------------------------------------------------------------+
| Processes:                                                                              |
|  GPU   GI   CI              PID   Type   Process name                        GPU Memory |
|        ID   ID                                                               Usage      |
|=========================================================================================|
|  No running processes found                                                             |
+-----------------------------------------------------------------------------------------+
Step 3: Install Docker + NVIDIA Container Toolkit
Perform a manual install of Docker as outlined here: https://docs.docker.com/engine/install/ubuntu/
First, set up Docker’s apt repo:
# Add Docker's official GPG key:
sudo apt-get update
sudo apt-get install ca-certificates curl
sudo install -m 0755 -d /etc/apt/keyrings
sudo curl -fsSL https://download.docker.com/linux/ubuntu/gpg -o /etc/apt/keyrings/docker.asc
sudo chmod a+r /etc/apt/keyrings/docker.asc

# Add the repository to Apt sources:
echo \
"deb [arch=$(dpkg --print-architecture) signed-by=/etc/apt/keyrings/docker.asc] https://download.docker.com/linux/ubuntu \
$(. /etc/os-release && echo "${UBUNTU_CODENAME:-$VERSION_CODENAME}") stable" | \
sudo tee /etc/apt/sources.list.d/docker.list > /dev/null
sudo apt-get update
Then install the latest version of Docker:
sudo apt-get install docker-ce docker-ce-cli containerd.io docker-buildx-plugin docker-compose-plugin
Finally, install the NVIDIA Container Toolkit. This will allow you to run GPU-accelerated apps in Docker containers.
Install the repository:
curl -fsSL https://nvidia.github.io/libnvidia-container/gpgkey | sudo gpg --dearmor -o /usr/share/keyrings/nvidia-container-toolkit-keyring.gpg \
&& curl -s -L https://nvidia.github.io/libnvidia-container/stable/deb/nvidia-container-toolkit.list | \
    sed 's#deb https://#deb [signed-by=/usr/share/keyrings/nvidia-container-toolkit-keyring.gpg] https://#g' | \
    sudo tee /etc/apt/sources.list.d/nvidia-container-toolkit.list
Then update the package list and install the toolkit:
sudo apt-get update
export NVIDIA_CONTAINER_TOOLKIT_VERSION=1.17.8-1
sudo apt-get install -y \
    nvidia-container-toolkit=${NVIDIA_CONTAINER_TOOLKIT_VERSION} \
    nvidia-container-toolkit-base=${NVIDIA_CONTAINER_TOOLKIT_VERSION} \
    libnvidia-container-tools=${NVIDIA_CONTAINER_TOOLKIT_VERSION} \
    libnvidia-container1=${NVIDIA_CONTAINER_TOOLKIT_VERSION}
Configure the toolkit to use the Docker runtime, and restart Docker:
sudo nvidia-ctk runtime configure --runtime=docker

sudo systemctl restart docker
To test that it’s working, run a sample CUDA container:
sudo docker run --rm --runtime=nvidia --gpus all ubuntu nvidia-smi
Again, you should see this type of output:
+-----------------------------------------------------------------------------+
| NVIDIA-SMI 535.86.10    Driver Version: 535.86.10    CUDA Version: 12.2     |
|-------------------------------+----------------------+----------------------+
| GPU  Name        Persistence-M| Bus-Id        Disp.A | Volatile Uncorr. ECC |
| Fan  Temp  Perf  Pwr:Usage/Cap|         Memory-Usage | GPU-Util  Compute M. |
|                               |                      |               MIG M. |
|===============================+======================+======================|
|   0  Tesla T4            On   | 00000000:00:1E.0 Off |                    0 |
| N/A   34C    P8     9W /  70W |      0MiB / 15109MiB |      0%      Default |
|                               |                      |                  N/A |
+-------------------------------+----------------------+----------------------+

+-----------------------------------------------------------------------------+
| Processes:                                                                  |
|  GPU   GI   CI        PID   Type   Process name                  GPU Memory |
|        ID   ID                                                   Usage      |
|=============================================================================|
|  No running processes found                                                 |
+-----------------------------------------------------------------------------+
Step 4: Install Portainer
Create the volume that Portainer will use:
sudo docker volume create portainer_data
Then download and install the Portainer container:
sudo docker run -d -p 8000:8000 -p 9443:9443 --name portainer --restart=always -v /var/run/docker.sock:/var/run/docker.sock -v portainer_data:/data portainer/portainer-ce:lts
Log in to the Portainer web interface to finish the setup; steps can be found here: https://docs.portainer.io/start/install-ce/server/setup
Step 5: Install OpenWebUI + Ollama
Finally—the last part to get a basic LLM chat interface up and running. Create a new stack in Portainer (this is essentially a Docker Compose file). Enter this as your stack:
services:
ollama:
    container_name: ollama
    image: ollama/ollama:latest
    restart: unless-stopped
    gpus: all       # NVIDIA GPU to Ollama
    environment:
    - OLLAMA_KEEP_ALIVE=24h
    volumes:
    - ollama_data:/root/.ollama
    ports:
    - "127.0.0.1:11434:11434"
    networks:
    - ollama-network
    # - "11434:11434"  # Ollama API

openwebui:
    container_name: openwebui
    image: ghcr.io/open-webui/open-webui:main
    depends_on:
    - ollama
    restart: unless-stopped
    environment:
    - OLLAMA_BASE_URL=http://ollama:11434
    volumes:
    - openwebui_data:/app/backend/data
    ports:
    - "3000:8080"              # http://<host>:3000
    networks:
    - ollama-network

networks:
ollama-network:
    driver: bridge

volumes:
ollama_data:
openwebui_data:
Okay, a lot is going on here, so let’s break it down. The first service is Ollama, which is required to run and serve your local LLM, so it’s passing the GPU to the container. The second service is OpenWebUI, which by default points at the Ollama service endpoint. Finally, this is tied together through an internal bridged network so we’re not directly pasting in an IP for the Ollama server. This becomes important later if you decide to expose the service publicly via NGINX.
Deploy your stack, and you’re up and running! Visit http://localhost:3000 or the address of your machine to start configuring and using OpenWebUI.
Step 6: Pull a model into Ollama
We’re almost there! To actually chat in OpenWebUI, you’ll need to pull an LLM into Ollama.
# example: Llama 3.1 8B
docker exec -it ollama ollama pull llama3.1:8b

# verify
docker exec -it ollama ollama list

# quick smoke test
docker exec -it ollama ollama run llama3.1:8b "Say hello in 8 words."
Once that’s done, it should be immediately visible in OpenWebUI if everything was set up correctly.
And there you have it—a completely local version of ChatGPT running on your own hardware! In Part 2, I’ll explain different methods to download models to Ollama, either from their website or through Hugging Face, and which models to use depending on your hardware. Thanks for reading!